Picture this: You’re halfway through cleaning your living room and suddenly, your vacuum cleaner stops picking up dirt. Frustrating, right?
If you’ve ever faced this scenario, your vacuum cleaner belt might be the culprit. Replacing it isn’t as daunting as it seems, and with a few simple steps, you can have your vacuum back in tip-top shape. Imagine the satisfaction of fixing it yourself and the relief of not having to buy a new appliance.
In this guide, you’ll discover just how easy it is to replace a vacuum cleaner belt, saving you time, money, and the headache of dealing with dust bunnies. Keep reading to reclaim your clean, fresh home with confidence.

Credit: www.youtube.com
Table of Contents
ToggleTools And Materials Needed
You will need a few simple tools. Gather a screwdriver for opening the vacuum. A new belt is also needed. Check that it fits your vacuum model. A soft cloth helps with cleaning. Dust and debris need removing. A small brush can also help. Make sure the brush is clean. Safety gloves protect your hands. Use them while working. Keep all tools nearby. This saves time and effort.
Identifying The Belt Type
Vacuum belts come in different types. Knowing your belt type is important. Check your vacuum cleaner’s manual for belt details. Manuals usually list the belt type and number. Look at the vacuum cleaner’s model number. This can help you find the right belt. Some belts are flat. Others are round or geared. Flat belts are the most common. Geared belts have teeth on them. Round belts look like a loop of rubber. Bring your old belt to the store. This helps in buying the right one.
Accessing The Belt Area
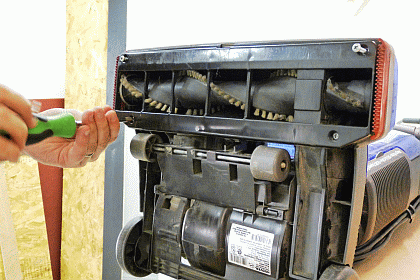
Start by unplugging the vacuum cleaner. This is for safety. Find the screws or clips that hold the cover. Use a screwdriver to remove them. Keep the screws safe. Open the cover carefully. You will see the belt area. Locatethe belt. It is usually near the brush roll. Check if the belt is broken or loose. If broken, take it out. If loose, check the tension. Remember to keep your fingers away from sharp parts.

Credit: www.amazon.com
Removing The Old Belt
First, unplug the vacuum cleaner. This keeps you safe. Next, find the bottom of the vacuum. Flip it over carefully. Look for the screws that hold the cover. Use a screwdriver to remove them. Keep the screws safe in a small bowl. This helps you not to lose them. Lift the cover gently. You will see the old belt. It wraps around two parts. Take a good look at how it is placed. This makes it easy to remember later. Slide the belt off the roller. Then, remove it from the motor shaft. Sometimes, it might be a bit tight. Gently pull to get it off. Now, the old belt is out. You are ready for the next step.
Installing The New Belt
First, make sure the vacuum is unplugged. This keeps you safe. Look for the belt area. It is usually near the brush. Remove the old belt if it is there. Now, take the new belt out of the package. Check that it is the right size. A wrong size belt will not work.
Slide the new belt over the motor shaft. Then, loop it over the brush roll. Make sure it is tight. A loose belt can slip off. Put the brush roll back in place. Turn it a few times. This ensures the belt is on correctly.
Finally, secure any covers or screws. Plug the vacuum back in. Turn it on. Check that everything works smoothly. If it does, you did a great job! You have successfully replaced the vacuum cleaner belt.

Credit: www.instructables.com
Frequently Asked Questions
Is It Easy To Replace A Vacuum Belt?
Replacing a vacuum belt is generally straightforward for most models. Follow the manufacturer’s instructions carefully. Ensure you have the correct belt type and size. Tools needed are usually minimal. Regular maintenance can prevent frequent replacements and keep your vacuum running efficiently.
Always unplug before starting any repair.
How Do I Know If My Vacuum Belt Is Bad?
Check for burning smells, unusual noises, or reduced suction. Inspect the belt for visible wear or damage. If the vacuum brush isn’t rotating, the belt might be broken. Regular maintenance and timely replacement ensure optimal vacuum performance.
How Do I Tell What Vacuum Belt I Need?
Check your vacuum’s model number and manual for belt specifications. Visit the manufacturer’s website for details. You can also remove the old belt to find its number or size printed on it. Ensure you purchase the correct belt type for optimal performance.
How To Replace A Vacuum Belt At Bissell?
Unplug the vacuum and remove the bottom cover. Take out the old belt and install the new one. Ensure the belt is aligned properly. Reattach the cover securely, then plug the vacuum back in to test functionality. Regularly check the belt for wear to maintain optimal performance.
Conclusion
Replacing a vacuum cleaner belt is simple. Follow the steps carefully. Save money and extend your vacuum’s life. Regular maintenance is crucial. Check the belt often for wear and tear. A new belt can improve suction power. Keep your home cleaner and more efficient.
Don’t hesitate to tackle this task. With basic tools, anyone can do it. Enjoy a cleaner space with a well-maintained vacuum. Feel confident in your repair skills. Share your success with friends. Encourage them to try it too. Your vacuum will thank you!


